Archived Mold Remediation Blog Posts
Prevent Mold and Avoid Damage: Simple Tips to Follow Year-Round | SERVPRO of Mid-City San Diego
3/24/2025 (Permalink)
 Contact SERVPRO of Mid-City San Diego now to learn more about how we can help protect your home from mold!
Mold can be a pesky problem for homeowners in San Diego, especially when the weather shifts throughout the year. SERVPRO of Mid-City San Diego knows just how important it is to prevent mold growth before it becomes a costly and time-consuming issue. With some simple tips and a little proactive care, you can keep your home safe from mold damage all year long!
How Seasonal Weather Affects Mold GrowthIn San Diego, we’re fortunate to enjoy mild weather, but it can also create the perfect environment for mold. During the rainy season, especially in winter and early spring, increased humidity can cause moisture to build up inside your home. If that moisture isn’t properly managed, mold can start to grow, typically in areas like bathrooms, kitchens, and basements where there’s already plenty of moisture.
Simple Tips to Prevent Mold in Your HomeControl Indoor Humidity
San Diego’s seasonal humidity can make a perfect breeding ground for mold, so controlling moisture levels inside your home is key. Use dehumidifiers, especially during the wetter months, to keep the air dry. You can also make sure your air conditioner is functioning properly to help with humidity control year-round.
Ensure Proper Ventilation
Ensure that your home has proper ventilation, especially in rooms that tend to trap moisture, like bathrooms and laundry rooms. Always use exhaust fans when cooking or showering, and if possible, open windows to allow fresh air to circulate. This is a great way to prevent mold buildup!
Fix Leaks Promptly
Any leaks in your roof, windows, or plumbing need to be fixed quickly. Even a small leak can lead to significant mold problems if left unaddressed. San Diego’s occasional heavy rains can exacerbate these issues, so be sure to inspect your home after storms for any signs of water damage.
Regularly Inspect Your Home
Make it a habit to regularly inspect areas like crawl spaces, basements, and under sinks. If you catch moisture or mold early, you can prevent major damage and mold problems down the line.
When to Call SERVPRO of Mid-City San DiegoIf you notice mold growth, it’s important to take action immediately. SERVPRO of Mid-City San Diego offers professional mold remediation services to ensure your home stays safe and dry. While prevention is important, sometimes mold can sneak up on you, and that’s where we come in. Don’t wait for mold to cause further damage — get in touch with us today!
Contact SERVPRO of Mid-City San Diego now to learn more about how we can help protect your home from mold!
Mold Prevention in the Winter | SERVPRO of Mid-City San Diego
12/3/2024 (Permalink)
 Keep your home mold-free this winter—SERVPRO of Mid-City San Diego has expert tips and services to help!
Winter in San Diego might not bring heavy snow or freezing temperatures, but it does come with unique conditions that could lead to unwanted mold growth in your home. Even with the city’s typically mild winter weather, with average temperatures ranging from the low 40s to the high 60s, the moisture and humidity brought on by winter rain can create an environment where mold thrives. SERVPRO of Mid-City San Diego is here to share essential mold prevention tips for this season.
Why Mold is a Risk in the Winter
While San Diego winters are relatively warm compared to many places, they still bring increased humidity and rainfall, especially from December to March. Mold loves moisture, and the combination of damp air and infrequent ventilation can create the perfect conditions for growth in your home. Protecting your home from mold means understanding how to manage humidity and control moisture levels.
#1 Control Indoor Humidity
One of the most effective ways to prevent mold growth during the winter is by controlling the humidity inside your home. Invest in a quality dehumidifier to keep the air dry, especially in mold-prone areas like bathrooms, basements, and laundry rooms. Remember, keeping your home’s humidity below 50% is key to mold prevention.
Additionally, ensure your home is well-ventilated. Open windows on dry days to let fresh air circulate, and use exhaust fans in your kitchen and bathrooms to reduce moisture levels. SERVPRO of Mid-City San Diego recommends keeping an eye on humidity levels, even during the cooler months.
Address Water Leaks and Moisture Quickly
With the winter rains, it’s critical to inspect your home for leaks. Check your roof, windows, and basement for any signs of water intrusion. Even a small leak can become a big mold problem if left untreated. Make it a habit to wipe down wet surfaces in the bathroom and kitchen, and never let water sit on floors or counters for extended periods.
Clean and Maintain Gutters
Clogged gutters can lead to water pooling around your home’s foundation. In San Diego’s rainy winter, this can result in moisture seeping into your home, creating the perfect environment for mold. Regularly clean and maintain your gutters, ensuring they are free of debris so water flows away from your home. This small step can make a significant difference in mold prevention.
Winter mold prevention in San Diego requires proactive measures. If you discover mold or need professional guidance, SERVPRO of Mid-City San Diego is here to help®. Our team of experts can ensure your home stays safe and mold-free throughout the season.
Protect your home from mold this winter! Visit SERVPRO of Mid-City San Diego today to learn more about our mold prevention and remediation services.
What to Do if You Find Mold in Insulation?
7/17/2024 (Permalink)
 Addressing mold issues promptly and effectively is crucial to maintaining a safe and healthy living environment.
Discovering mold in your insulation can be alarming. Mold not only damages your property but also affects the air quality in your home. Addressing mold issues promptly and effectively is crucial to maintaining a safe and healthy living environment. In this blog, we'll guide you through the steps to take if you find mold in your insulation, including how to identify mold, remove it, and prevent future growth.
How to Identify Mold in Insulation
Mold can be tricky to spot, especially when it’s hidden in insulation. Here are some common signs that you might have mold in your insulation:
- Musty Odor
One of the first indicators of mold is a musty, unpleasant odor. If you notice a persistent smell in certain areas of your home, it could be a sign of mold in the insulation.
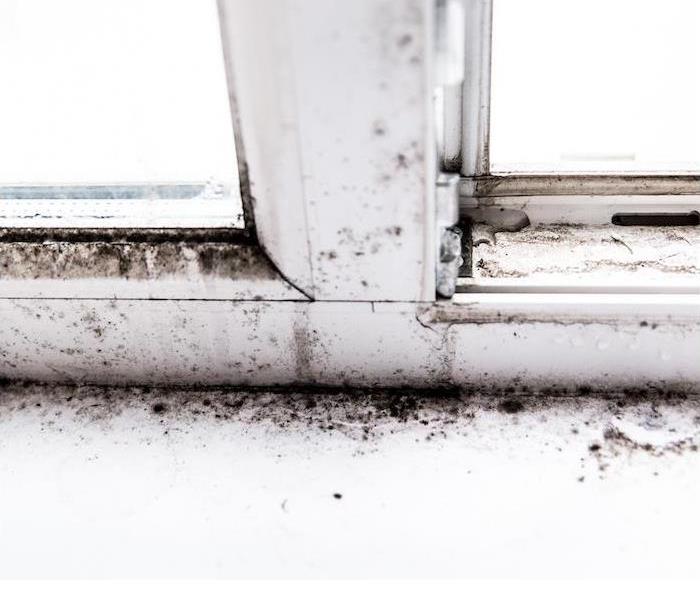
- Visible Mold Growth
Check your insulation for any visible signs of mold. Mold can appear as black, green, or white spots and can often be found in damp or poorly ventilated areas.
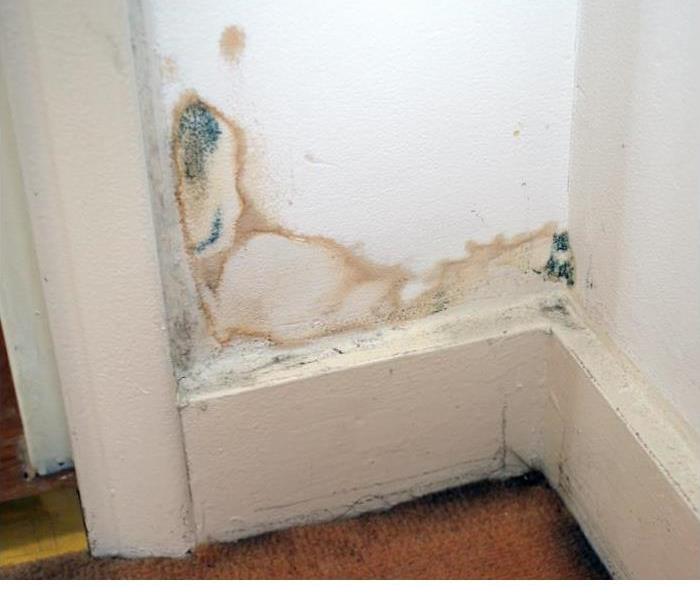
- Discoloration or Stains
Discoloration or stains on walls and ceilings near the insulation can indicate mold growth. If you notice unusual stains, it's worth investigating further to determine if mold is present.
Steps to Take If You Find Mold in Insulation
If you suspect or find mold in your insulation, it's important to take immediate action. Here are the steps to follow:
- Assess the Extent of the Mold
Determine how widespread the mold problem is. A small, localized area can often be handled by homeowners, but larger infestations may require professional assistance.
- Wear Protective Gear
When dealing with mold, always wear protective gear, including gloves, a mask, and goggles. This helps prevent exposure to mold spores.
- Isolate the Area
Seal off the affected area to prevent mold spores from spreading to other parts of your home. Use plastic sheeting and tape to cover doorways and vents.
- Remove Contaminated Insulation
Carefully remove the moldy insulation and place it in heavy-duty plastic bags. Seal the bags tightly and dispose of them according to local regulations. Be sure to handle the insulation gently to avoid releasing mold spores into the air.
- Clean the Surrounding Area
After removing the contaminated insulation, clean the surrounding area thoroughly. Use a mold removal solution or a mixture of water and detergent to scrub all surfaces. Be sure to dry the area completely to prevent mold from returning.
- Replace the Insulation
Once the area is clean and dry, replace the old insulation with new, mold-resistant insulation. This can help prevent future mold growth and improve your home's overall insulation.
- Fix the Moisture Problem
Mold thrives in moist environments, so it's essential to address any underlying moisture issues. Check for leaks, improve ventilation, and consider using a dehumidifier to keep humidity levels in check.
Finding mold in your insulation can be a daunting experience, but with the right steps, you can effectively address and prevent it. By identifying the signs of mold, safely removing contaminated insulation, and taking preventive measures, you can maintain a healthy and safe living environment. If you encounter a significant mold problem, don’t hesitate to contact a professional mold remediation service like SERVPRO of Mid-City San Diego for expert assistance. Keeping your home mold-free ensures better air quality and protects your property from damage.
Mold in Your Basement: Causes and Remediation Strategies
3/13/2024 (Permalink)
 In this blog, we will explore why mold may occur in basements and provide tips on how to remediate mold effectively.
Discovering mold in your basement can be a concerning issue. While mold growth poses potential risks to your property, it is important to understand the causes and effective remediation strategies for addressing mold in your basement. In this blog, we will explore why mold may occur in basements and provide tips on how to remediate mold effectively.
Causes of Mold in Basements
Basements are prone to mold growth due to several contributing factors. Understanding these causes can help in preventing mold in the first place. Here are some common causes of mold in basements:
- Moisture Intrusion: Excessive moisture in the form of water leaks or seepage is one of the primary culprits behind mold growth in basements. Leaky pipes, foundation cracks, or floods can introduce moisture into the basement, creating an ideal environment for mold to thrive.
- Poor Ventilation: Inadequate air circulation and ventilation in basements trap moisture, increasing the humidity levels. Higher humidity provides the necessary conditions for mold growth.
- Dampness and Condensation: Basements tend to be cooler than the rest of the house, making them more prone to condensation. When warm air comes into contact with cooler surfaces, such as walls or pipes, condensation can occur, creating a moist environment suitable for mold growth.
Remediation Strategies
If you discover mold in your basement, prompt action is crucial to prevent further damage. Here are some effective remediation strategies to tackle the issue:
- Identify and Fix the Source of Moisture: Start by locating and addressing any sources of moisture intrusion in your basement. Repair pipe leaks, seal foundation cracks, and address any other issues causing moisture to enter your basement. This step is vital to prevent recurring mold growth.
- Improve Ventilation: Enhance the airflow in your basement by using fans or opening windows. Consider installing an exhaust fan or a dehumidifier specifically designed for basements to help reduce humidity levels.
- Remove Mold-Infested Materials: If there are porous materials like carpets, drywall, or insulation that have been extensively affected by mold, it may be necessary to remove and replace them to eliminate mold completely.
- Clean and Disinfect: For mold growth on solid surfaces, use a solution of one part white vinegar to three parts water or a commercial mold cleaner recommended for use in basements. Scrub the affected areas thoroughly, ensuring all visible mold growth is removed.
- Dry Thoroughly: After cleaning, make sure to dry the basement entirely to prevent future mold growth. Use fans, dehumidifiers, and open windows to promote airflow and remove any lingering moisture.
- Consult Professionals: If the mold growth is extensive or if you are unsure about the proper remediation process, consult professionals like SERVPRO® who specialize in mold restoration services. They have the expertise, equipment, and techniques to handle severe cases of mold in basements, ensuring effective remediation.
Understanding the causes and implementing appropriate remediation strategies are vital steps in addressing mold in your basement. By identifying and rectifying the sources of moisture intrusion, improving ventilation, and taking prompt action to remove mold growth, you can restore your basement and prevent further damage. Remember, prevention is key, so regularly inspect your basement for any signs of moisture or mold and address issues promptly to maintain a healthy and mold-free environment.
A Complete Guide to the Mold Damage Restoration Process
11/16/2023 (Permalink)
 Mold damage can be a homeowner's worst nightmare
Mold damage can be a homeowner's worst nightmare. Understanding the mold damage restoration process is essential to effectively address this issue and restore your home to a safe and comfortable living space. In this blog, we provide a comprehensive guide to the steps involved in the mold damage restoration process.
1. Initial Assessment
The first step in the mold damage restoration process is a thorough assessment of the affected area. This involves identifying the type of mold, the extent of the infestation, and the underlying causes, such as leaks or high humidity. A precise assessment is essential for developing a targeted restoration plan.
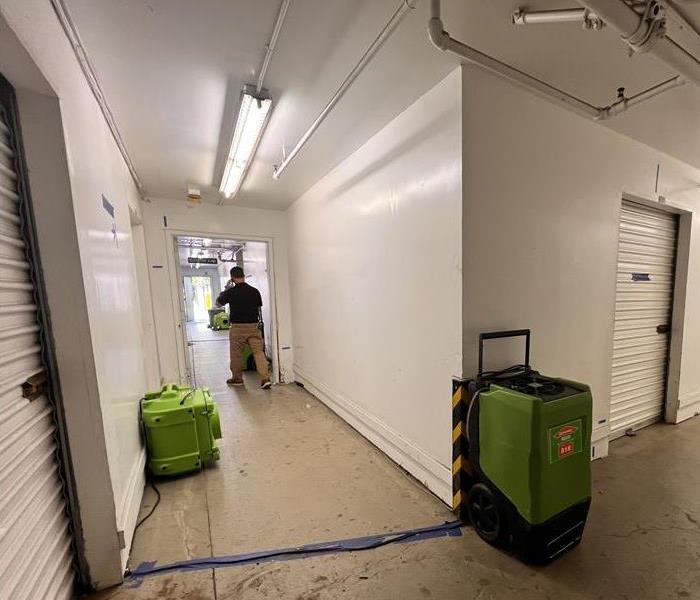
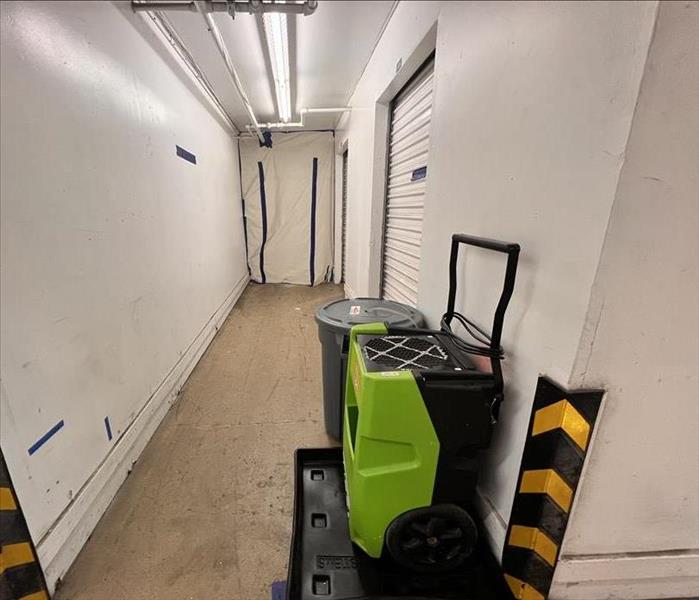
2. Isolation and Containment
To prevent the spread of mold spores, containment measures are implemented. Plastic sheeting and negative air pressure systems are used to isolate the affected area and prevent cross-contamination.
3. Mold Removal
The next critical step is the safe and thorough removal of mold from affected surfaces. Moldy materials may need to be discarded, and specialized cleaning techniques are employed to eliminate mold and its spores.
4. Air Filtration
High-efficiency particulate air (HEPA) filtration systems are used to capture airborne mold spores and particles, further preventing the spread of mold during the removal process.
5. Cleaning and Sanitizing
All surfaces and materials in the affected area are meticulously cleaned and sanitized to eliminate any remaining traces of mold and prevent its return.
6. Drying and Dehumidification
Addressing the underlying moisture issue is crucial to prevent future mold growth. Dehumidifiers and air movers are used to ensure the affected area is thoroughly dried.
7. Repairs and Restoration
If structural materials or surfaces were damaged during the mold infestation, repairs and restoration are carried out to return your home to its pre-damage condition.
8. Final Inspection
A final inspection is conducted to verify that all mold has been removed, and the property is safe for occupancy. Any necessary adjustments or additional repairs are made at this stage.
9. Preventative Measures
To ensure mold doesn't return, it's essential to address the root causes of the infestation, such as fixing leaks, improving ventilation, and reducing humidity levels.
10. Documentation
Throughout the restoration process, detailed documentation is maintained, including photographs, moisture readings, and records of all work performed. This documentation is crucial for insurance claims and future peace of mind.
Understanding the mold damage restoration process is the first step to a successful recovery. When dealing with mold, it's essential to work with a professional restoration team like SERVPRO® of Mid-City San Diego. We have the experience, expertise, and resources to efficiently restore your property and ensure it remains mold-free. If you're facing mold damage, don't hesitate to reach out for immediate assistance!
How to Safely and Effectively Remove Mold from HVACs and Ducts: A Step-by-Step Guide
5/8/2023 (Permalink)
Mold growth in HVAC (heating, ventilation, and air conditioning) systems and ducts can be a serious health hazard, as it can spread mold spores throughout your home or building. If you suspect that there is mold in your HVAC system or ducts, it's important to take action as soon as possible to prevent it from spreading. In this blog, we'll discuss how to remove mold from HVACs/ducts.
Turn off the HVAC system
The first step in removing mold from HVACs/ducts is to turn off the system to prevent the mold spores from spreading. This may involve turning off the power to the system and shutting off the air supply.
Assess the extent of the mold growth
The next step is to assess the extent of the mold growth in the HVAC system and ducts. This may involve inspecting the system and ducts visually or using specialized equipment to test the air quality and moisture levels. This may require a professional with expertise in the HVAC industry.
Contain the mold
Once the extent of the mold growth has been determined, the next step is to contain the mold to prevent it from spreading. This may involve sealing off the affected area with plastic sheeting and using negative air pressure to prevent mold spores from escaping. Call a professional immediately to prevent secondary damages.
Remove the mold
The next step is to physically remove the mold from the HVAC system and ducts. This may involve using specialized cleaning solutions and equipment to remove the mold from the ducts, coils, and other components of the system.
Clean and disinfect
After the mold has been removed, the HVAC system and ducts will need to be thoroughly cleaned and disinfected to prevent the mold from returning. This may involve using specialized cleaning solutions and techniques, such as HEPA vacuuming, to remove any remaining mold spores.
Repair and maintenance
Finally, any damage to the HVAC system and ducts will need to be repaired, and steps will need to be taken to prevent mold from returning. This may involve repairing leaks and improving ventilation and air flow in the system.
In conclusion, removing mold from HVACs/ducts can be a complex and time-consuming process, but it's important to address the issue to protect your health and prevent further damage. By working with a professional mold remediation service, you can ensure that the mold is properly removed from your HVAC system and ducts, and steps are taken to prevent it from returning.


 24/7 Emergency Service